Tonight I stand at our kitchen sink doing dishes while Jeff is nestling with Nate and Elli as they hopefully drift off to sleep. Dishes are mundane and need to be done, but I often find this as my place. A place with minimal interruptions, to be in my own head. As a wife, mom, and student, solitude is minimal and often overlooked. Throughout this Fall, I've been making a conscious effort to snatch bits here and there...the walk up the hill after dropping Nate off at school, dishes, a couple of uninterrupted moments in the shower. We were created to need time to think and be.
Tonight, I am once again struck with the awesome beauty bestowed on us by our Creator God. Its snowing out. As the snowflakes descend many are being blown about by the evening's breeze. The outside lights are on and casting shadows of the falling flakes on the sparkling snow. It's gorgeous! It's quiet! I feel at peace and loved.
Wednesday, December 28, 2011
Friday, November 25, 2011
First sledding!
There's something absolutely magical about heading out to go sledding for the first time each winter season. There's also something magical about sledding after dark. Put the two together and the potential is there for amazing amounts of fun and memories. Tonight we had both!
Each year we enjoy snow more! This year we were in NH for Thanksgiving when we got our first real snow. We brought snowpants, hats, mittens, boots, and a good amount of excitement about the incoming storm that "forced" our holiday travels to start early. However, we did not have room for the sleds. This did not stop the kids from enjoying the wonderful sticky morning blanket. A snowball fight with Great Grampa made everyone giggle. Elli made a really big snowball that turned into the base of a really tall snowman/rabbit (depends on who you talk to and where you stood) with the help of GGB,Nate, cousin Connor. The boy cousins and I made a pretty sweet igloo out of the plowman's piled chunks. Afterwards we piled back inside the "Greats" house for homemade hot chocolate courtesy of Alton Brown. Well his recipe at least... Hot Cocoa Mix
On our drive home Nate and Elli turned their thoughts towards sledding. Questions from the backseat started ringing out... "Can we go sledding when we get home?" "Will we have snow at home?" "Do we have to eat dinner first?" My answers, "If we have snow at home." "We'll have to see." "Let me think about it." We did indeed have snow ... and dinner first. Our few inches packed quickly into a great path and we had a blast. Nate's repeated cries of, "Kids, don't try this at home," were hysterical. Elli was just taken with being out and being able to control her sled this year. So much fun! The stars watched us slide and it was glorious!
Each year we enjoy snow more! This year we were in NH for Thanksgiving when we got our first real snow. We brought snowpants, hats, mittens, boots, and a good amount of excitement about the incoming storm that "forced" our holiday travels to start early. However, we did not have room for the sleds. This did not stop the kids from enjoying the wonderful sticky morning blanket. A snowball fight with Great Grampa made everyone giggle. Elli made a really big snowball that turned into the base of a really tall snowman/rabbit (depends on who you talk to and where you stood) with the help of GGB,Nate, cousin Connor. The boy cousins and I made a pretty sweet igloo out of the plowman's piled chunks. Afterwards we piled back inside the "Greats" house for homemade hot chocolate courtesy of Alton Brown. Well his recipe at least... Hot Cocoa Mix
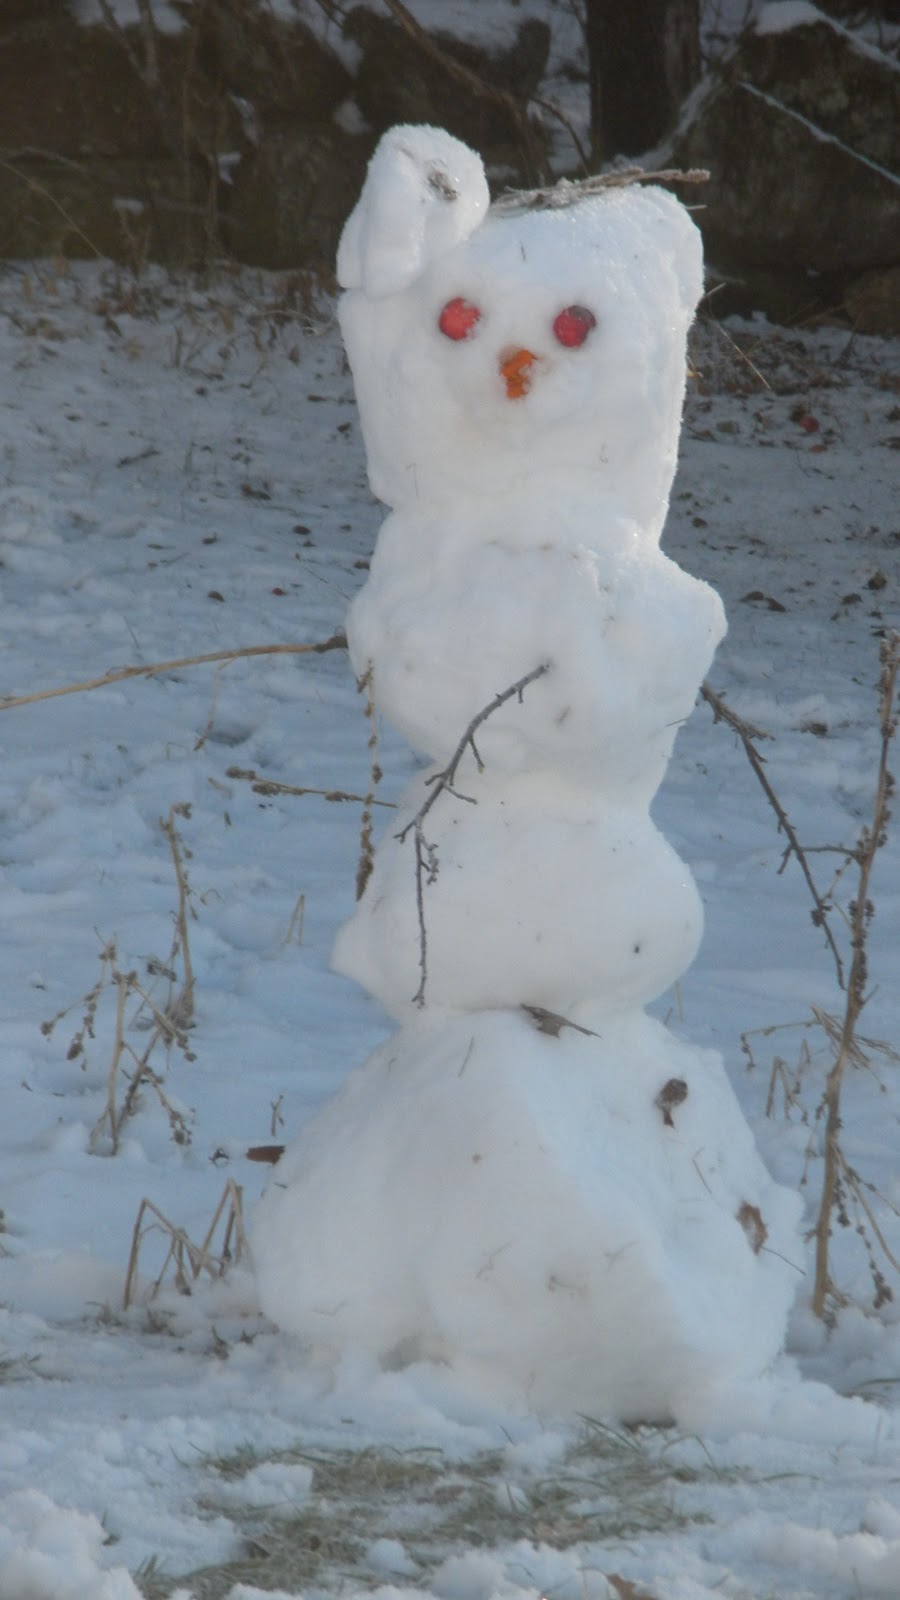 |
| Elli's snowman with apple eyes! |
 |
| Nate & Connor's Igloo! |
Friday, October 28, 2011
It's been too long...
It's been a long time since I've sat down, or stood up as the case may be, to write. I initially took the summer off to just enjoy creating memories and the freedom of summer. I had the best of intentions of recording some of our summer adventures once school started. What I didn't foresee was our family's late summer decision that I too would go back to school. Life changes and so do our priorities.
School has been wonderful and difficult all at once. My creaky 13 years out of school brain, has taken some reconditioning to get back to thinking academically. I will share that, there's hope. After a couple of months I'm now able to read academic journal articles in a much shorter time period and even more importantly, I'm understanding them!
Jeff and the kids have been wonderfully supportive of this process. They've had lots of Papa outings, dishes are primarily no longer done by me, and we have changed bedtime routines without greatly sacrificing the quality time shared snuggling before sleep.
Priorities have shifted many of these changes have been positive, a feel leave us feeling sad. One great thing is that much of my studying occurs after 8:00 pm and we now watch far less TV (Jeff catches up on some fun reading he missed out on while he was in school). We've had to say no to some things or take a backseat. Even this, in may ways, has been positive allowing others to come into greater roles of leadership and self reliance. Creativity has not suffered greatly. This week we've make popcorn balls, created a family of large stuffed fleece owls, and Nate's been creating a newspaper using some of his newly acquired kindergarten writing skills.
This Fall has not been easy, but it has been immensely rewarding. I hope to share updates, but just not quite as regularly as last Spring. I do love writing and creating a record of memories of our wanderings,so I hope to not lose this entirely to my academic pursuits.
Tuesday, May 10, 2011
Treasure!
If you have children, you more than likely have this in abundance. Stuffed behind the couch, under the table, in bed, the closets may even be exploding with it! It takes many forms, but to your child it all boils down to the same thing... and you can NEVER throw it out!
TREASURE!!! What we often call clutter is actually valued treasure to our treasures! Those items so desperately wanted or found are so highly valued for a day or a week, then go unnoticed until you're ready to put them in the trash (some, of course, are not deserving of the trash). A small sampling of our treasures include: pinecones, seed pods, books, party favors, drive through toys, bottle caps, random pieces of rubber, and a host of small vehicles. I'm sure you could add to this list.
So, what to do with all this booty?
Have a treasure day! Find a location to stow away the treasure for your child to rediscover it periodically throughout the day . It becomes new again and less like "useless junk." Today was a cleaning day for me, which makes the kids frustrated that Mama can't play. The finding of treasure kept the kids busy and they didn't mind my decreased interaction. The downside to this was that Nate and Elli kept wanting me to hide treasure instead of playing with what they had. We had to make a rule that more treasure would appear only if they didn't demand it. I also stashed some learning items such as magnifying glasses and guide books for them to find which later gave me a nice cleaning break where I snuggle and explored the books with them.
Stow it! Package it up in little bags or boxes for specific situations. We recently brought 10 little plastic airplanes to a soccer game. Nate only came home with 8, but he and his friends had a great time playing with them. I've set aside some Happy Meal trucks for beach play this summer. We also rotate toys to keep them fresh.
Donate it! Some items may have value to another child. Helping your child determine what they should keep or share has lifelong value. Honestly, sometimes I include them in this process, others not so much.
Toss it! At our current ages, I find that this is best done after bedtime. My personal guidelines for this? I never throw out something they've actively played with recently. I don't throw out items that have true value to someone. So far very little has been missed and the few times it has been, I'm not lying when I honestly answer that "I don't know where your leaf is right now."
Host a Swap! Get together with a few friends and have each child bring 3-5 things to trade for someone else's treasure. Do this when children are at their best and have snacks. (I have not actually tried this.)
Create a game! As the kids are becoming older we're starting to be able to be more creative. Game play is big in our house. We can use some of our treasures as game pieces for new games.
Thoughts? How do you manage your children's junk... um... I mean treasure?

Wednesday, April 20, 2011
"Best Birthday Party Ever!!"
Today was a special day, Jeff's birthday! Nate and Elli LOVE birthdays and were very excited to throw Papa a party. In fact they were a bit dismayed when I shared that it would be a simple family party with the four of us. (They recently watched an episode of Curious George where George threw the Man with the Yellow Hat a surprise party.) Once the initial dissatisfaction with this arrangement was over, both embraced throwing Papa a "simple" party. At the end of the night Nate announced that this was "the best birthday party ever!" I have to agree, tonight was the most fun I've had at a birthday party in a long time!

The kids had ownership of much of the process and they adore Jeff - a fun combination. They picked out the sports plates and blue balloons at the Dollar Store. Each made paper cakes decorated with oil pastels and paper strip candles. They helped tidy up with less than normal prompting, so it would be nice when Papa came home from work.
Nate and Elli wanted to decorate the cake. We had done this with Elli's cake, but personally I found the crunch of the candy on the frosting a bit off-putting and sweet. This time we took one of our favorite activities and adapted it for a cake. My fruit fans love to make fruit kabobs. Kabob sticks + various fruits = engaging activity and beautifully fun to eat snack for later. Today we found beautiful strawberries and blackberries at the market and they paired beautifully with our cake, Chocolate Cassata As a side-note, Mrs. Beck would be proud - Nate loves to use the patterns he learns at school while threading the fruit on his stick. "I'm making an A A B B pattern Mama!"

Today was organic in nature... not overly planned, in fact other than the cake, nothing about the day had really been set. Our day started with an adventure to pamper and surprise Papa...immediately dressing the kids, whisking them out the door, packing them in the car, and driving to the next town over for Papa's favorite doughnuts (their's too!). We came back home, dropped breakfast with a note and ran onto the grocery store to pick out ingredients for a special meal.
The kids had ownership of much of the process and they adore Jeff - a fun combination. They picked out the sports plates and blue balloons at the Dollar Store. Each made paper cakes decorated with oil pastels and paper strip candles. They helped tidy up with less than normal prompting, so it would be nice when Papa came home from work.
Nate and Elli wanted to decorate the cake. We had done this with Elli's cake, but personally I found the crunch of the candy on the frosting a bit off-putting and sweet. This time we took one of our favorite activities and adapted it for a cake. My fruit fans love to make fruit kabobs. Kabob sticks + various fruits = engaging activity and beautifully fun to eat snack for later. Today we found beautiful strawberries and blackberries at the market and they paired beautifully with our cake, Chocolate Cassata As a side-note, Mrs. Beck would be proud - Nate loves to use the patterns he learns at school while threading the fruit on his stick. "I'm making an A A B B pattern Mama!"
 |
| Recent Fruit Kabobbing |
Focussed family time! With Jeff finishing up his Master's next month, we have been on a weird family schedule with bits and pieces here and there. Tonight school work was set aside for a couple of hours to celebrate!
Simple games to fit the space and kids abilities. Elli wanted to play tag and Nate wanted to play soccer. Jeff suggested, "Balloon Bounce." We all worked to keep balloons up in the air without catching them. We laughed and had a lot of fun! When this became old we played "Boof." A game invented by our friends Todd and Tricia when their children were young which involves "boofing" each other with a soft object. Tickles and giggles ensued.
Thursday, April 7, 2011
Doctor's Office Tranquility...?
Elli recently had her three year check-up. For some, doctor's visits are a semi-traumatic annual experience, but we're fortunate. Other than the occasional shot reluctance, our kids are pretty laid back. There are a lot of little things that we do that make it relatively easy:
- Find a great pediatrician that meets your family's needs. Get recommendations from friends or parents at your local playgroup. Go and meet your pedi. with your child. How do they interact? Does your child like her/him?
- We focus on our need to be healthy throughout the year. A doctor's visit is just part of that process.
- Model good doctor's visits. The kids have each gone to the doctor's with Mama at various times and seen Mama remain calm, even while getting a shot.
- Play doctor at home. I found a doctor's kit at a thrift store for $2. Let the kids be the doctor and you the patient. Switch roles. If fears come out, talk about them.
- We talk about the visit beforehand, sharing expectations of the visit. This is a great time to sense any anxiety and talk about it.
- When they ask if they're going to have a shot before the visit, I answer honestly. We talk about how it might feel like a pinch for a minute or two, but will help them stay healthy throughout the year.
- Feed the child! We all get cranky when we're hungry. If my child is comfortable then we have fewer meltdowns (works for grocery shopping too).
- Keep a list of questions with your child's shot record and bring them both with you!
- Let your child answer as many of the doctor's questions as possible. This one is often tough for me, but I'm realizing that this empowers them, giving them a chance to take charge of their medical experience, something that will serve them well.
- We go prepared for fun! The doctor's office is a mini-field trip. It's their chance to explore a new profession. Our pediatrician is great! She lets the kids check out her equipment and ask questions.
- Finally, I often have something hiding in my bag of tricks. For Elli's visit I had our bag of animals (this bag often goes into restaurants for the pre-meal wait) and a box of crayons. If your doctor's office is like most, it probably comes fully equipped with a perfect piece of drawing paper already laid out on the examination table. Why not put it to good use while you wait?! When our pediatrician came in Elli was laying quite comfortable on her tummy drawing on the examination table paper ready to tell the doctor about her artwork which lead effortlessly into the day's questions and exam! For one of Nate's visits I had a new matchbox car that he could play with while we waited. If bringing both children I have something for both but something specifically to keep the non-doctor's-visit child engaged throughout the visit.
I'd love to hear your ideas for an anxiety reduced/free doctor's visit!
Wednesday, April 6, 2011
Arrrggg... Nice Pirates!
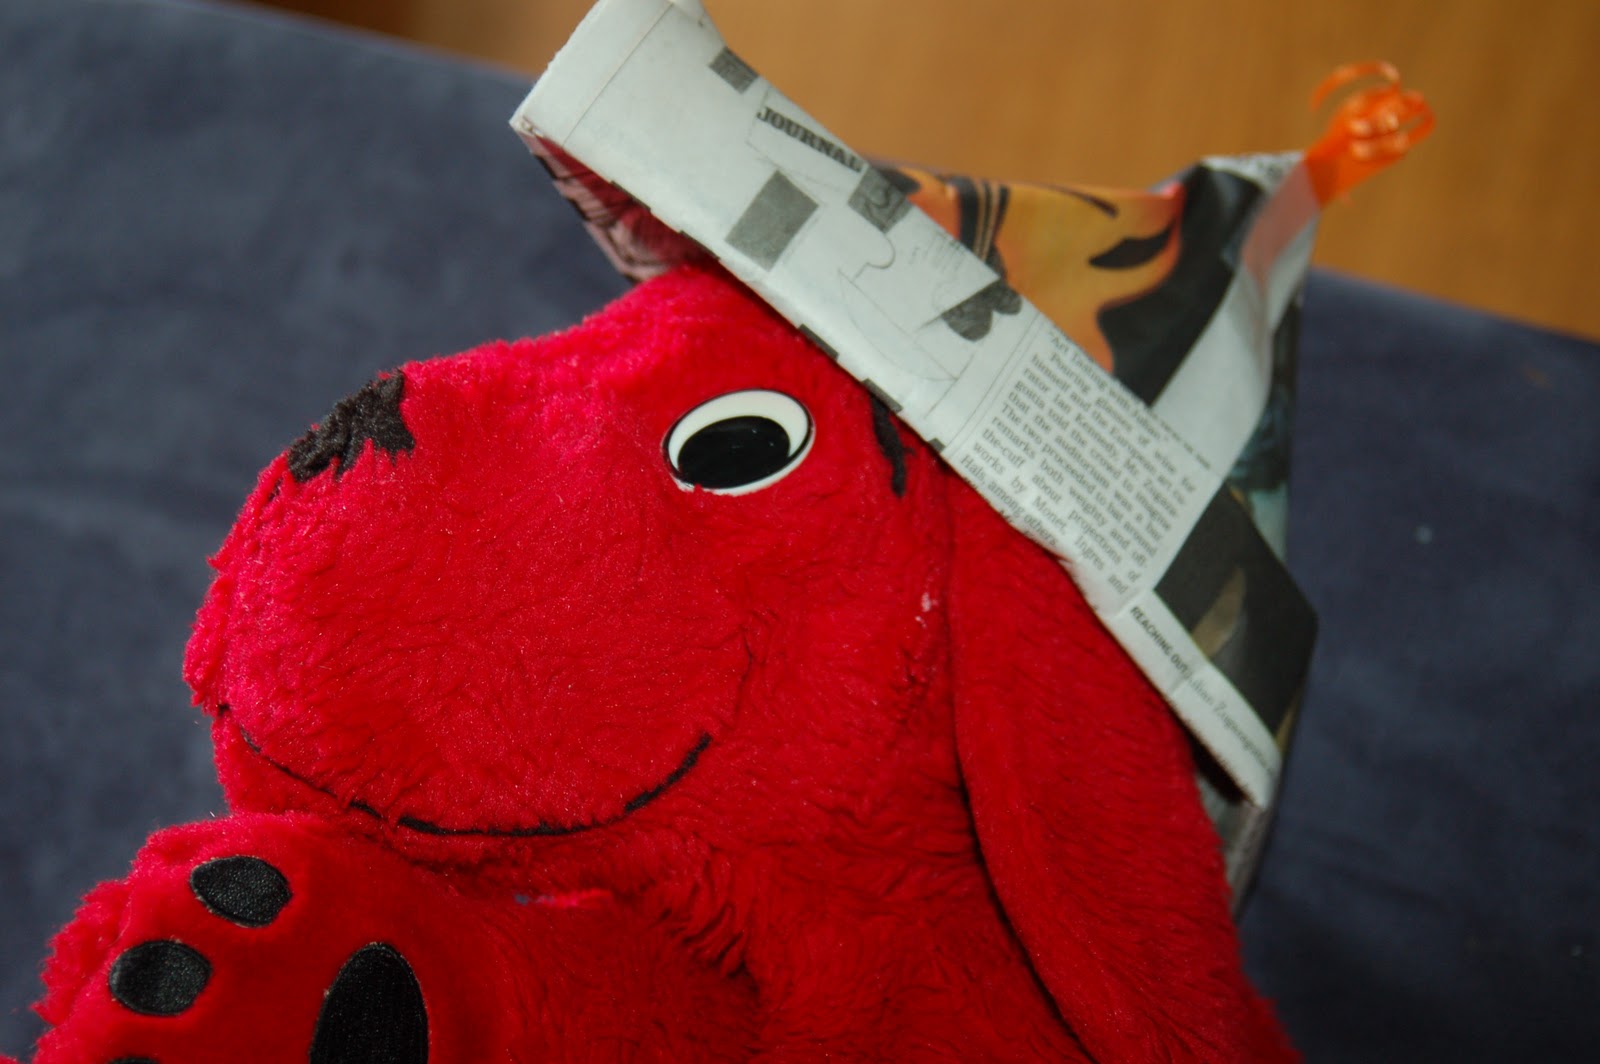
When in college I had to return one break with a favorite childhood toy. Ahhh... the life of a recreation major! For my choice I brought in some paper. Yes, I had forgotten to grab something at home, but also I spent hours playing with paper. Hats, airplanes, origami, coutoure dresses for my dolls, tic-tac-toe, hangman, not to mention drawing and coloring...
So today's activity was one of those quintessential childhood activities... PAPER HATS!!
While there are a number of great websites that share the directions for a basic paper hat, I've added a few tricks to refine the fit. You'll need a newspaper and double sided tape.
Start with a full double page of a standard newspaper. Folded, with the fold at the top.
(This picture is already folded).

Then fold right edge to the middle crease and tear or cut off at your new crease line like so...

Fold your new smaller rectangle in half to make a new middle crease line. Unfold. Once this is done, fold the top right corner down to the center crease. Repeat with the left top. This is where the double face tape comes in. Take one piece and place it across the center fold, but under the newly folded flaps. This will secure the top portion of you pirate hat.

Fold one bottom edge up to meet the bottom of your triangle. Then repeat so you have a double thickness. Flip hat over and repeat on the back of the hat.

Secure the newly formed band of your hat with 2-3 pieces of double sided tape on each side.

Accessorize and wear!
(Or as in our case, go crazy and make them for the kids and all their stuffy friends!)
Tuesday, March 22, 2011
Flying Flowers! That's Awesome! a.k.a. - Preserving Creative Moments
Yesterday was a sick day... for me. Not your traditional sick day. It was oddly and wonderfully creative.
The rocks came out. Pictures were taken. Workbooks were done. Lunch was had. Rest time was treasured! Then as if by some miracle the kids disappeared, reappeared for paper and other supplies and then were mysteriously quiet. Ominously quiet...
Then the invitation came. "Mama, come up here and create with us!" I have to admit my stuffy head preferred to stay horizontal on the couch. However they had been playing so well I had to see what they were up too. In the upstairs hallway was a hastily created art space. Busy beavers had been drawing, cutting, and taping their creations with copious amounts of tape to their bedroom walls. Their work was beautiful and peaceful! The next offer was to decorate our room. I love my kids artwork, but too often it becomes clutter. How could I preserve this moment of creative tranquility without miles of tape? With a moment of clarity, I had it!
I dashed into the art room to nab a large empty picture frame and some fabric for a background. We then sat down to create; the kids drew the pictures and I cut them out. Then using the inside cardboard from the frame for a guide I trimmed the fabric to fit the frame. Once the fabric was cut we laid out our pictures, including the underground digging machine, on the fabric until everyone was satisfied. During this process Nate decided that the "Nate" and "Elli" in the picture should be holding hands. Elli helped me paint Tacky Glue onto the back of our pictures and glue them to the fabric. In our excitement we went ahead and framed it before Papa came home (If I were to do this again we will wait for the glue to dry before framing as the glue faded one of Elli's pictures). The kids are so excited to see their creations framed!
 |
| All of us riding the train by Nate. |
 |
| Elli's caterpillar, butterfly, and flowers. |
 |
| Nate's houses, digger, and mouse houses at bottom. Elli's sun and fairies with flying flowers/birds above the house. |
 |
| The completed masterpiece! |
We now have a wonderful art piece that honors the kids' creativity as a 3 and 4 1/2 year old!
How do you honor your kids' creations?
Monday, March 14, 2011
Creative Snacking
 |
| Snacks To Go! |
Like many we're trying to make healthier life choices (I know pie for breakfast doesn't shout healthy... but it's Pi Day!). One prominent area that we can easily change is our snacking habits. Keeping healthy snacks close at hand makes this a lot more probable. This morning we sent Jeff off to work with a week's worth of healthy snacks to keep in his office. I found four canning jars, any recycled jar will work, and filled them with some favorites. Pistachios for a bit of salt, raw almonds for a bit of staying power, craisins for that tart sweet, and some dark chocolate chocolate chips to provide the little pick me up to avoid the vending machine's 3:00 pm shouts from down the hall! Nate also added to Papa's healthy snacks with a quick trip to the fridge, returning with an apple.
 |
| Nate's Healthy Addition |
It's easy to check out the nutritional benefits/pitfalls of your favorite snacks through a quick web search. Pistachio's and almonds may reduce cholesterol, have needed fats for our bodies and contain valuable antioxidants. These are all benefits not found in the cookie from the coffee shop or the vending bar candy bar.
At home we're also keeping things such as cheese sticks, yogurt, raisins, and of course apples. Tortillas with peanut butter and banana or apple are also favorites. I also find that pre-packaging snacks in single servings is helpful.
What are your favorite snacks?
What are your favorite snacks?
Monday, March 7, 2011
Snowed In? Bake Bread!
Pictures coming soon!
Today we were snowed in and while I make bread on other days too, it seemed the logical choice. Homemade bread is a favorite at our house and there is nothing quite like being greeted by the smell of freshly baked bread after shoveling mountains of snow. I have my mother's recipe; I fondly remember coming home from school to this smell ... warm white bread spread with butter...mmm. I've been looking for ways to improve the nutritional content without making it seem heavy, and think that I may have hit on a perfect combination today. It's probably still not the healthiest of breads, but it's better than straight white and it still hit the spot for a yummy yeast bread. So without further comment here it is:
Snowed In Bread
Yields 3 loaves in standard bread pans
I used a mixer with a dough hook, but you can certainly do this by hand.
Directions:
In a large mixing bowl (You'll add all other ingredients later), whisk (by hand):
2 1/4 teaspoons yeast (1 packet)
1 tablespoon sugar
in
1/2 cup warm, but not hot water.
Let this rest in a warm place for 10 minutes.
In the meantime, melt 1/2 cup shortening and grease your bread pans.
Once the 10 minutes is up, beat in:
1 beaten egg
2 cups lukewarm water
1 1/2 teaspoons salt
1/2 cup of honey
1/2 cup melted shortening (I add this last and slowly with the mixer running so it won't cook the egg.)
In a large bowl sift:
2 cups whole wheat flour
5 1/2 cups white flour
Add in:
1/4 cup ground flax seed
Add flour mixture one cup at a time to the wet ingredients mixing thoroughly after the addition of each cup. If you are mixing by hand at some point you will need to knead the rest in by hand. Once all flour is incorporated, knead for 10 minutes. You will have a smooth, but slightly sticky dough.
Dump dough onto a lightly floured counter-top and knead in just enough flour to make dough less sticky. (I used about an 1/8th of a cup.
Grease bowl and return dough to bowl. Wet a dish towel with hot water, wring out, cover the bread, and place in a warm area. Let rise for an hour or until the dough has about doubled.
Punch down dough and dump out on a clean counter-top. Divide into three equal pieces and place in prepared pans. Re-wet dish towel with hot water, wring out, and cover bread. Again place in a warm spot to rise for an hour and a half.
Place loaves in a cool oven. Set heat at 400 degrees for 15 minutes. Then turn heat down to 375 degrees for 25 minutes. Bread should be pulling away from pan, be golden, and should sound slightly hollow when tapped. Remove from oven and let cool for 10 minutes in the pans. Tip out and finish cooling on a wire rack.
This recipe was adapted from a recipe found in the blue covered Joy of Cooking.
Sunday, March 6, 2011
Let the Decluttering Commence...

So I confess, I'm a major clutterbug... So this challenge will be interesting! Stay tuned for details of my success/doom... :-)
http://simplemom.net/project-simplify/
Saturday, March 5, 2011
Princess Party
Today we hosted a princess party for our three year old princess, Elliana. I'm finding that birthday parties are getting easier and new ideas start to evolve. For Elli's party we kept it relatively simple, but I wanted to share a new idea that I had. We often do scavenger hunts at parties. Nate's birthday parties, being in June, have seen their share of peanut scavenger hunts. This equals a big bag of peanuts in shells hurled throughout a defined area and preschoolers with lunch bags hurriedly scampering around to collect as many as possible. (Yes, we check beforehand to make sure none of our guests have peanut allergies.) However with Elli's birthday this was not quite possible. Preschoolers trudging through waist-deep snow desperately searching for peanuts does not create a picture of mirth and delight, unless you are a local squirrel.
So back to Elli's Scavenger Hunt. The kids really wanted candy, and I wanted balance. The solution: I created this checklist:

Each child was given a bag and this list. During the directions, parents and older siblings were encouraged to help the younger party goers find the specified number of each item. This list helped each child get an equal amount of the loot while assuring that none of the parents were terribly upset about the excessive amounts of sugar entering their homes. We also asked that the kids not eat the candy while at the party since we would soon be having cake and ice cream. I wondered as I was explaining it if it was too abstract for our group of three year olds, but most seemed to get it and parents were great helpers. The free for all on the foam glitter stickers (Tubs of these can be found at most craft stores) enhanced the experience without upping sugar consumption. Another by-product was that the kids were doing early math. They had a graph and had to match up and count their treasures. After all the littles were content, the three older siblings were sent in to glean all they could find ... aka clean up the room :-)! Everyone was happy when they came back in for cake and ice cream.
Here are a few additional things which lead to its success...
The guest list - Elli chose from one primary group of friends. She wanted her playgroup friends. This was an easy group and nobody was left out. We had four friends and some of their siblings. Most of the parents knew each other and visited easily.
Defined play areas - While our space is not huge we had an area set aside for the doll-house, kitchen play-set, finger puppet theater, an art table with paper and stamps, and a Lego area for the older siblings. We encouraged free play.
Cool music - Pandora.com set on the Recess Monkey station rarely steers us wrong. A lively band made up of teachers with a great sound that parents enjoy too.
Healthy snacks before cake - When guests arrived they were greeted with a tray of apples, cheese, crackers, pretzels and baby carrots. I shared with parents the drink options and encouraged them to help themselves whenever their child was thirsty.
Bedrooms were off - limits - While we often allow friends to play in the kids rooms, we decided against it for the party. This isolated the mess and made clean-up much easier.
Shopping clearance - I often keep my eyes open for good bargains. Napkins, decorations, and favors were bought at a fraction of their original cost. Plates and cups were purchased at the Dollar Store.
Prepping of the Birthday Girl - We want to assume that we've taught our children well and they'll automatically be a gracious hostess, however this is a learned skill. The day before the party Elli and I had a conversation about welcoming our guests, looking for cards first when opening gifts, and being sure to say thank you to our guests. I reminded Elli of these points a few moments before guests started arriving. She did beautifully.
Gifts or cake first? We opted for cake. Elli got the first piece and was able to start eating. Then when she had eaten her fill she was able to clean up and open presents while her friends finished their cake and ice cream. I saved her leftover cake for later.
Keep decorations simple. Too much can be overwhelming to preschoolers and become a stress to you.
Clean as much as you can in advance - This was especially good since I ended up spraining my ankle late morning after a morning of cleaning.
Friday, February 18, 2011
Wandering
Today I get the opportunity to start a service wandering by traveling with InterVarsity New England to New Orleans to work with Habitat for Humanity and some other groups. I'm keeping this post short as I still have some packing and errands to run in the next four and half hours before we load up our van.
Why am I doing this? Several reasons. The most simple: Jesus served people and he calls us to do likewise. Secondly this trip models service for Nate and Elli and, while they will miss Mama, it sets a good example of helping others for them to follow. (Leaving for a week is made a lot easier knowing that I have an awesome husband who loves being with his children. - They're going to have a great time.
While I'm gone I'm giving Nate and Elli a project. They have Hands Journals. I started by tracing my hand and a short message to both of them. While I'm gone they're going to see lots of friends and family. Each journal has the following instructions in the front:
Please help Nate & Elli complete their hands project.
Thanks for your help!
Why am I doing this? Several reasons. The most simple: Jesus served people and he calls us to do likewise. Secondly this trip models service for Nate and Elli and, while they will miss Mama, it sets a good example of helping others for them to follow. (Leaving for a week is made a lot easier knowing that I have an awesome husband who loves being with his children. - They're going to have a great time.
While I'm gone I'm giving Nate and Elli a project. They have Hands Journals. I started by tracing my hand and a short message to both of them. While I'm gone they're going to see lots of friends and family. Each journal has the following instructions in the front:
Please help Nate & Elli complete their hands project.
Find an empty page and trace your hand. Write your name and the date. Also if you’d like you can write them a special message. Elli has the green notebook and Nate’s is blue!
Tuesday, February 15, 2011
Puppet Play
Recently Jeff brought home a couple paper boxes from work for the kids to play with. These more often than not end up as cars. However this time I had in mind a higher purpose. We have an array of finger puppets that have found their way into our home, and of course they needed a proper performance space! Nate and Elli were embraced the possibility of a new toy and eagerly handed over one of their boxes and shared the "car."

For this project you will need:
1 sturdy paper box
Rugged scissors or a knife (adult use)
A metal clothes hanger
Wire cutters
14 brass fasteners
A piece of fabric 13" x 24" (I used wool), cut into two pieces 13" x 12"
About two feet of duct tape
Crayons/markers/etc. to decorate theater
Note: We had all of these items on hand, if you don't have something just look around and see what you can substitute.)
Cut a rectangle in the bottom of the box. Ours was 4"x12." Basically you want to leave about two inches around each edge to retain the integrity of the box structure.
Using wire cutters, cut off the hook and twisted part of the hanger. Straighten out the hanger and set aside.
Cut your fabric into two pieces, 13"x12" each. Taking your brass fasteners punch through the front of the fabric at regular intervals across the 12 inches about a half inch from the top. Once each fastener is through you will want to make a loop by making a "V" with the ends of the fastener. You will then bend each end together until they are overlapping (see picture). Do this for all 14 fasteners.

Push one end of the straightened wire hanger through the top front of the box about a half inch from the front and top. Thread on the curtains (this is a great job for kids), and then push it out the other side. Bend the extra wire on each end down to be parallel to the sides of the box. Duct tape these in place.

Decorate. Nate and Elli drew a house and sky on the backdrop. We have also been toying with the idea of making a slit in the back of the box and cutting cardboard to fit. They can then decorate this to change scenes.
To use your puppet theater take two chairs and set them so the seats are facing each other. We like to then put a blanket so the audience can't see the puppeteers. Set your theater box on and you're ready to go!
To create a home for our puppets we recycled a small oatmeal box and did a google image search for "puppets." I then copied and pasted this onto a center of the sheet and typed "PUPPETS" in a fun font. We glued this onto the box and now our puppet have a place to go at the end of the day!
Saturday, February 5, 2011
Observations from a morning of painting

Nate and Elli started painting while still in their highchairs. It was easy then. I'd strip them down to their diaper and give them a piece of paper, a couple colors, a brush (or not) and let them go. I'd have the tub on stand by and tada! we'd have some great baby art! It was actually amazingly similar to eating spaghetti.
Today with an almost 3 and 4.5 year old we've reworked and refined the process a little more and, while a bath was still needed for a certain little girl who ended up with some purple hair, it went incredibly smoothly. I took great delight in watching the evolution of their creativity. Here are some of my observations:
Sense of Story - As they were painting both Nate and Elli were talking about what was going on in their paintings. Nate's was a little more developed, but he's been at it a little longer and for Elli I was able to ask questions to bring out a greater level of thinking.
Sharing - There was one paint jar for each color with one brush. They had to wait their turn. More often than not, I observed them using their "please" and "thank-yous."
Appreciation of Other Techniques - At one point Nate commented that "Elli wasn't doing it right" when she was dabbing her paper with the brush. We were able to talk about how different people do things differently and with painting Elli would get different results with spots. I referenced a book we had read, The Dot by Peter Reynolds, about a little girl whose art teacher's insight changed her view of her artistic abilities.
Pride and Care - Each took time with their paintings to do them well. They were focused on their creations and were happy to tell me about them. They were excited!
Curiosity in the Other's Work - Throughout our time of painting, Nate and Elli were asking each other what the other was painting. There was an awareness and joy that they were doing something wonderful together and they didn't want to miss out on what the other was doing.
Pride in Others - At one point Nate excitedly said, "Elli you made a perfect dog!" While Elli's dog didn't look a ton like a dog it was somewhat recognizable. Nate had recognized her hard work and affirmed her. Elli was so proud at Nate's praise.
Articulating Needs/Wants - Neither one of the kids had any trouble letting the other know exactly what they needed. "Nate, I want green!" "Mama, I'm all done! More paper please!"
Basic Color Recognition - Both in choosing paints and mixing colors on their papers, the kids were routinely recognizing colors. When we first started painting in the highchair days, I would put out two primary colors and say their names often while the kids were painting. When they'd make a new color we'd excitedly name it. "You just made orange!"
Following Basic Instructions - While this is sometimes a challenge, I laid out clear and simple expectations which, on this day, were pretty much followed. Each paint had its own cup with its own brush. One expectation was that we not mix brushes, although mixing colors on the paper was embraced. The second expectation was that we use brushes on the paper. The final expectation was that when they were done with a color they would put it back in the middle of the table for the other to use. Both Nate and Elli eagerly embraced these expectations and it showed in their finished artwork. I'm happy to say that our paints are still relatively unmixed for our next color adventure!
Creative Thinking - This was evident throughout our time painting in the discovery of new shapes, use of color, and techniques. It was also evident when Elli got tired of painting and started building with our unused paint brushes.
Problem Solving - "Mama, we don't have any green!" turned into an opportunity to figure out how to make some!
Responsibility - When the final painting was finished I watched as they embraced the cleaning process, something that we often struggle with (If you visit my house on short notice you will most likely see bits of paper, markers, crayons, and glitter adorning our floors and tables). After our painting adventure I asked Nate and Elli to bring their brushes to the sink where they each washed some. They learned that when the water ran clear their brush was clean. Part of their eagerness to clean the brushes related to the lack of said brushes due to poor cleaning of recently deceased brushes. They want to paint again!
Simple Math - Simple questions. "How many colors do we have?" "What shape is that?" "Is that a pattern?" Also we did a matching game as part of clean up with the paint cups and their matching lids.

This list could go on... I was amazed at what I saw in about 45 minutes when I took the backseat and primarily just watched Nate and Elli's creativity. It was awesome!
In the near future I'll post tips for setting up a painting station.
Thursday, January 13, 2011
Feed the Birds... Take 4
During the summer we have lots of little winged visitors in our yard when flowers create a natural buffet, however we have not had much success drawing them in during the winter months when food is scarcer for them. With the arrival of heavy snows we have felt the desire to feed them once again. So here is attempt #4.

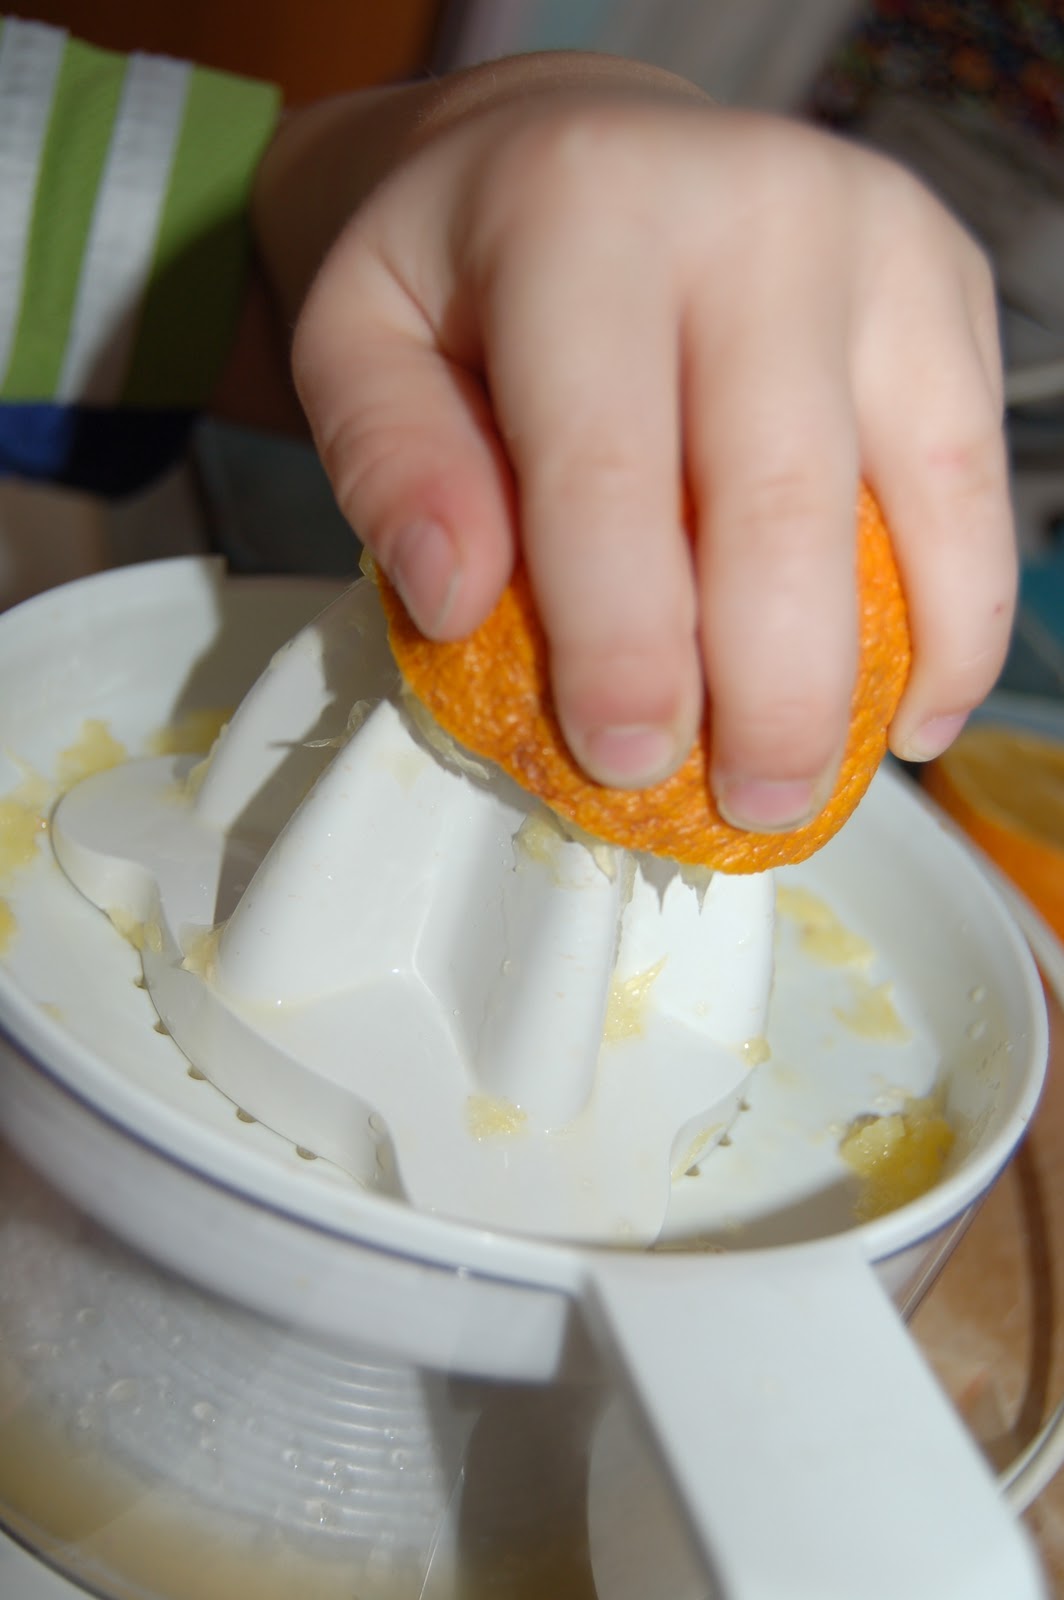
I have wondered if we lacked eye catching curb appeal. Our previous attempts have lacked color, so this became our focus this time around. I had some oranges that were a little past their prime, but not rotten. We cut them in half, juiced them, found some wire and made hangers. Nate was able to help me poke the wire through the orange and turn it up, although I had to do the twisting to lock it into place and form a hook for hanging.
 |
| Our slightly sketchy oranges |
Orange Bird Cups
You'll need:
2 oranges
A juicer is helpful, but not necessary.
Wire - #19 gauge or any other light to medium gauge
Wire cutters
1 Tablespoon shortening
1/2 cup peanut butter
2 cups bird seed
bowl
spoons
Begin by halving and juicing your oranges. Remove most of the pulp while keeping the peels intact. Cut 12 8" lengths of wire. Carefully use the wire to poke three equally spaced holes around the edge of the orange. Thread one piece of wire through each leaving about and inch to twist and secure wire in place. At this point you should have three wires around the edge of the orange pointing up. Twist these together and create a hook. A hook can easily slip over a tree branch and then be squeezed together to make it secure. You now have a nifty hanging cups to fill.
Combine the peanut butter and shortening. Stir in the bird seed. Pack mixture into the orange cups. Bring outside and hang for the birds to enjoy!
Friday, January 7, 2011
Too Much Creativity?
Hello, it's been awhile since I've posted. I've been working to creatively catch up from Christmas. :-)
Today's question: What are the downsides of creativity? This is something that I've been pondering recently. In the long run I don't really see any, but I have to be honest sometimes creativity is an inconvenience. Having Nate in my face enthusiastically wanting to make a one wheeled race car (later figured out he wanted to make a wheelbarrow), painted with flames, and handles, that Clifford could ride in, right now! while prying my sleepy eyes open and stumbling downstairs was probably not one of my best moments of encouraging creativity!
After my brain woke up, about two minutes after getting downstairs, we looked at his project. He had re-purposed a square box, and wanted a wheel in the front. When I explained that we didn't have any wheels, he ran over and grabbed a sturdy plastic wrap tube. With a confident, "This will work," he handed it to me. By now I was getting into this. I went and grabbed some yarn from the art case and poked two holes in the box, ran the yarn through one hole, the tube, up through the other hole and tied it off. Nate was delighted, although it still doesn't roll quite to his satisfaction. Next he was off thinking about handles! Another tube appeared. This one was very thick and pretty strong. When I commented that I didn't know if I could cut it because it was so strong he reminded me, "Mama, you're pretty strong too!" I have to admit this comment melted my heart and made it a little easier to work on this project less than 10 minutes out of my cozy bed. As soon as this was done he was ready to start painting. I had to put the brakes on here as he needed to leave for school, but I'm sure that we'll be painting this afternoon.
So why do I share this dizzying, slam of early morning creativity?
First to show the power of books and the importance of reading in opening up creativity. He had been reading The Dragons' Book of Make-Believe, a PBS Dragon Tales book. In it they pretended a wheelbarrow was a ... drum-roll please.... race car! Books inform our play and foster creativity. They challenge us to dream, to think outside our everyday. Through this process Nate was learning to overcome obstacles and think creatively. My "but we don't have any wheels," didn't stop him. This is a skill that will serve him well in life.
Second, to encourage any parents or future parents reading this to set the inconvenient aside. It would have been incredibly easy to brush off Nate's project as trivial, a mess in the making, or too time consuming. By eventually embracing it I was blessed to see his creative mind in action. My thinking was challenged and that too increases creativity.
Well, I need to go pull together some painting things and then go pick Nate up from school. I'm thinking that we might need to make a stop at the hardware store and pick up some nuts, bolts, and washers on the way home...
Subscribe to:
Posts (Atom)